Enigma · Volume 19
Enigma — Volume 19 — Sending Real Messages
A key sheet, the wartime drill, every setting entered on the Open Enigma, and a U-boat's signal from November 1942 coming back out of the lamps
19.1 About This Volume
A cipher machine proves itself in one way only: a message goes in at one end and comes out, intact, at the other. This last volume puts the Open Enigma to that test. I have used my machine to encode and decode messages; this volume sets out how that is done, from a key sheet to five-letter groups and back, with every setting entered on the replica’s keys.
It covers a key sheet and the wartime procedure for using it, kept brief because Volumes 4, 6 and 11 cover it in depth; entering each setting on the Open Enigma, mode by mode; a fully worked message, enciphered, checked and deciphered; a real U-boat signal of November 1942, broken by a distributed computing project in 2006, reproduced on the machine; a short test of the replica’s three-rotor mode with reflector C, which may or may not behave like a real Enigma I; and how to cross-check any of this against software simulators.
Every ciphertext and plaintext in this volume was computed with a small reference simulator written for these volumes (enigma_sim.py). It checks itself against two genuine wartime messages and against S&T GeoTronics’ and BJ Gleason’s published test cases before it computes anything. None of the examples was enciphered by hand.
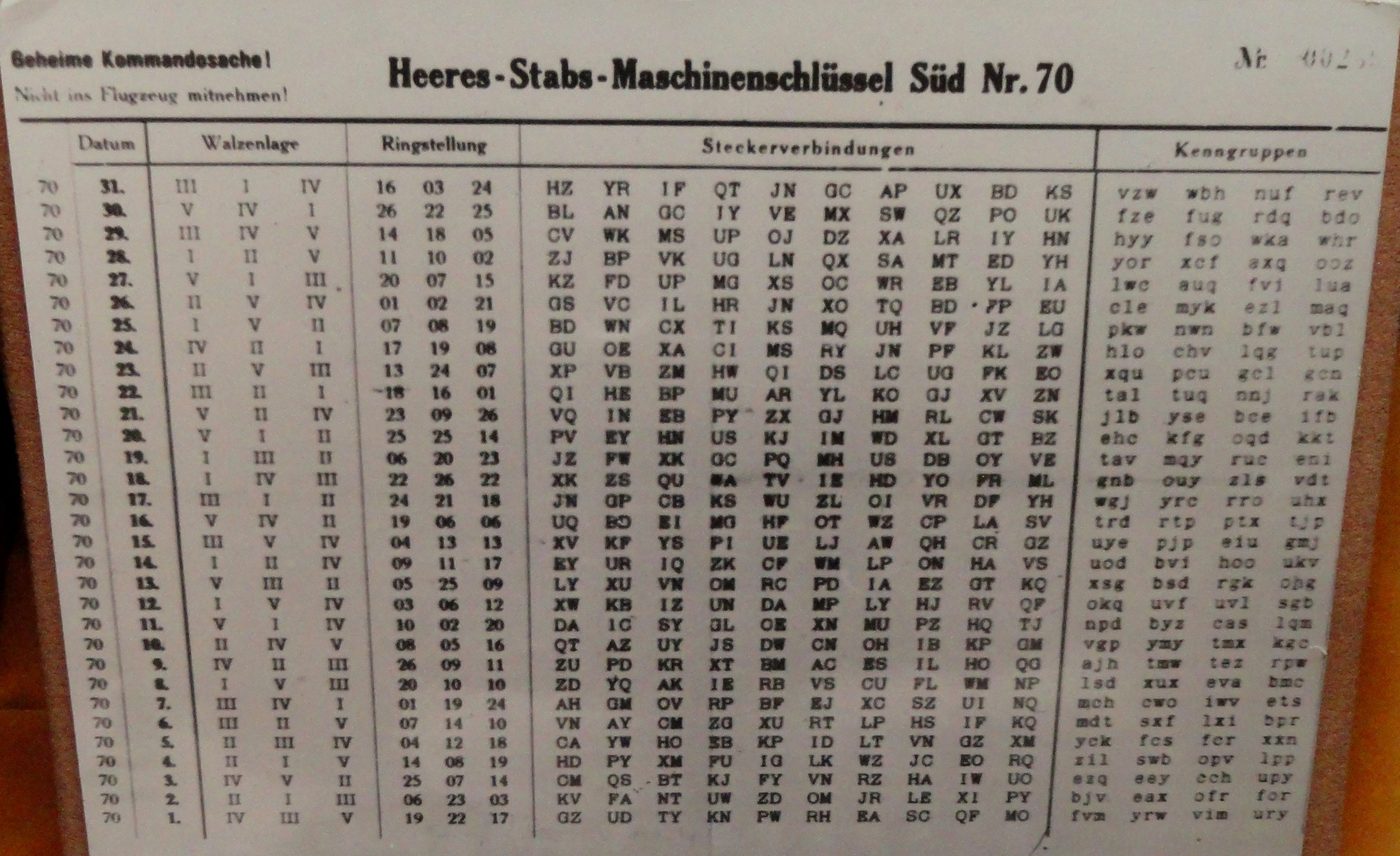
19.2 A Key Sheet
Every Enigma message begins with a key that sender and receiver share. In wartime it came from a printed sheet, one row per day, valid from midnight to midnight (Volume 4). The sheet below is invented for this volume, but it is laid out like a German Army sheet of 1939–40 and uses only what that sheet would have specified.
Table 1 — A Key Sheet
| Datum | Umkehrwalze | Walzenlage | Ringstellung | Steckerverbindungen | Grundstellung |
|---|---|---|---|---|---|
| 26 | B | II V III | 06 22 14 | AM BT CQ DH EW FS GZ IP KR LY | UHL |
Read across:
- Umkehrwalze B — the reflector.
- Walzenlage II V III — rotor II on the left, V in the middle, III on the right.
- Ringstellung 06 22 14 — the ring settings, given as numbers on Army sheets. As letters, 06 = F, 22 = V and 14 = N.
- Steckerverbindungen — ten plugboard pairs, leaving six letters (J, N, O, U, V, X) unplugged.
- Grundstellung UHL — the day’s “ground setting”, used only to encipher each message’s own key.
19.3 The Wartime Procedure, Briefly
The daily key was never used to encipher the message itself. Had every operator on a net started every message from the same rotor position, the whole day’s traffic would have been “in depth” and readable by statistics (Volume 4). Instead, each message ran from its own message key (Spruchschlüssel), a three-letter start position chosen by the operator, and the procedure for passing that key to the receiver changed over the war.
Army and Air Force, to 1 May 1940: the doubled indicator. The operator set the rotors to the day’s Grundstellung, typed his chosen message key twice, and wrote down the six lamps. He then turned the rotors to the message key itself and enciphered the text. The six-letter indicator went at the head of the message. The receiver set his rotors to the Grundstellung, typed the six letters, and expected to see the same three letters twice — a check against garbled Morse. That doubling was the regularity the Polish Cipher Bureau turned into a break (Volume 7).
Army and Air Force, from 1 May 1940: a chosen ground setting, enciphered once. The doubling was abolished. The operator now chose his own starting position at random, sent it in the clear in the message header, set the rotors to it, and typed the message key once; the three resulting letters followed it in the header. A real example, reproduced in the Wikipedia article on the Enigma machine among other places, is a German Army message of July 1941, during the invasion of the Soviet Union. Its header ends WXC KCH. With that day’s key (UKW B, rotors II IV V, rings 02 21 12, plugs AV BS CG DL FU HZ IN KM OW RX), setting the rotors to WXC and typing KCH lights BLA; at BLA the message begins
EDPUD NRGYS ZRCXN UYTPO MRMBO FKTBZ REZKM LXLVE FGUEY → AUFKLXABTEILUNGXVONXKURTINOWAXKURTINOWAXNORDW…
— Aufklärungsabteilung von Kurtinowa, Kurtinowa nordw[estlich]…, “reconnaissance battalion from Kurtinowa, Kurtinowa north-west…”. Army messages also carried a five-letter identification group, two random letters plus one of the day’s three-letter Kenngruppen from the key sheet, which told the receiver which key the message used.
The Kriegsmarine ran a different system altogether (Volumes 6 and 11). The naval operator did not choose a message key freely: he took indicator groups from a Kenngruppenbuch, enciphered through the machine at a Grundstellung, and then super-enciphered the indicators by hand with printed bigram tables. Naval text was sent in four-letter groups, not five. And on the four-rotor M4, a three-letter key meant setting the Greek wheel to A — the rule printed inside the lid of my case (Volume 16).
19.4 Entering a Key on the Open Enigma
The Open Enigma’s five modes follow the order in which an operator set up his machine, so the key sheet can be entered in one pass of the MODE button. The worked example below uses the Army procedure, so it uses the replica’s three-rotor M3 model. (It would give identical results in the default M4 model with the Greek wheel Beta at ring A and position A; that is the Merkblatt’s rule, and the reason the M4 could talk to Army machines.)
Table 2 — Entering a Key on the Open Enigma
| Step | Mode (LED) | Set | Display |
|---|---|---|---|
| 0 | — | With the power off, fit the ten cords: AM BT CQ DH EW FS GZ IP KR LY | — |
| 1 | Power on (no LED) | Press the leftmost UP key once to select the M3 model | Banner; on S&T’s firmware it ends “MARK 3 DT” |
| 2 | ROTORS | Use UP/DOWN under each of the three right-hand displays to choose rotors II, V and III; cycle the left keys until lamp B lights | _ 2 5 3, lamp B lit |
| 3 | INRINGS | Rings 06 22 14 as letters | _ F V N |
| 4 | OUTRINGS | The Grundstellung | _ U H L |
| 5 | PLUGS | Nothing to enter: the cords are read on entry | DONE |
| 6 | RUN | Type the message key twice | four rotor positions, stepping |
On a machine without the panel, step 5 is where the ten pairs are entered: “A TO M”, ENTER; “B TO T”, ENTER; and so on. Pairs can be entered in either order, and after the tenth the display shows DONE.
Two habits help. First, read the display back after each mode before pressing MODE: a ring setting one letter out produces fluent nonsense. Second, remember that MODE only goes forward. From RUN, four presses go round through power-on mode, ROTORS and INRINGS to OUTRINGS — which is exactly where the operator needs to be to set the message key.
19.5 A Worked Message
The message is a short weather report, written in English for readability but with the wartime conventions: no spaces, X as a separator, numbers spelled out.
WEATHER FORECAST FOR TOMORROW: RAIN, WIND SOUTHWEST, FORCE FIVE
becomes the 60-letter plaintext
WEATHERXFORECASTXFORXTOMORROWXRAINXWINDXSOUTHWESTXFORCEXFIVE
19.5.1 Enciphering
- Encipher the indicator. With the day’s key set and the rotors at the Grundstellung UHL, in RUN mode, the operator types his chosen message key KXR twice: KXRKXR. The lamps light N D L N G W. The rotor displays now read U H R: the right-hand rotor has stepped six times.
- Set the message key. Press MODE four times, to OUTRINGS, and set the three windows to K X R. Press MODE twice more, through PLUGS (which shows DONE, since the cords were read on the first pass) to RUN.
- Encipher the text. Type the 60 letters, writing down each lamp.
The result, in five-letter groups:
DODIR YJKDT JGPLI XAHGC BVAXL HNFKO NDUOG ZVUBO HKWHX JQQLB OSMLH JXTAQand the transmission is the indicator followed by the text:
NDLNG W
DODIR YJKDT JGPLI XAHGC BVAXL HNFKO NDUOG ZVUBO HKWHX JQQLB OSMLH JXTAQ
(In practice the header would also carry the time of origin and a letter count; Volume 4 describes the format.)
19.5.2 Watching it step
The rotor displays in RUN mode show the stepping as it happens, and this message shows both kinds. Rotor III, on the right, turns the middle rotor over as it moves past V. Rotor V, in the middle, turns the left rotor over as it moves past Z — and because the middle rotor’s own notch is engaged at that moment, it steps again: the double step of Volume 4.
Table 3 — Watching it step
| After letter | Plaintext | Lamp | Windows |
|---|---|---|---|
| 4 | T | I | K X V |
| 5 | H | R | K Y W ← III passes V; middle steps |
| … | |||
| 30 | X | O | K Y V |
| 31 | R | N | K Z W ← middle steps to Z |
| 32 | A | D | L A X ← double step: middle and left both step |
After the last letter the windows read L B Z. That is a useful check in itself: if a replica or simulator set the same way finishes on different positions, its stepping is wrong, whatever its lamps said.
19.5.3 Deciphering and the check
The receiver, with the same day’s key, sets the rotors to UHL and types the indicator NDLNGW. The lamps spell KXRKXR: the same key twice, so the indicator arrived intact. He sets the rotors to KXR and types the 60 cipher letters; the lamps spell the weather report.
The doubled indicator is the procedure’s own error check. The text has none, but a wrong setting announces itself at once. Here, for example, is what the same ciphertext gives if the receiver forgets the ring settings and leaves them at A A A:
SCZJU GSGUO NONJK AFDCD …Nothing like German, or English, and from the very first letter. In a wartime signals office, gibberish like that sent the operator back to the key sheet; on the replica it usually means a ring, a rotor or a cord.
19.5.4 The same message, after May 1940
Under the later procedure the operator picks his own ground setting, say QBT, sets the rotors to it, types the message key RLE once and gets PVA. The header carries QBT PVA, and the text is enciphered from RLE:
YMVJG TQKVV IKUFR MFVBE MIEAH CUYMF NCXRS VWHJD CYKUL DFHBY QGPKH NRWKK19.6 A U-Boat Signal from 1942
Real traffic is the better test, because nobody chose its settings to make a replica look good.
On 25 November 1942, U-264, commanded by Kapitänleutnant Hartwig Looks, sent a radio signal in the four-rotor naval Enigma. It was intercepted, and decades later it was one of three unbroken naval messages that the M4 Project, organised by Stefan Krah, set out to break by distributed computing. The project broke this one in 2006. Its recovered settings and plaintext are published on Dirk Rijmenants’ Cipher Machines and Cryptology site.
The settings, as the Open Enigma takes them:
Table 4 — The settings, as the Open Enigma takes them
| Setting | Wartime form | Open Enigma (default M4 model) |
|---|---|---|
| Reflector | UKW B (thin) | lamp B |
| Wheel order | Beta, II, IV, I | ROTORS B 2 4 1 |
| Rings | A, A, A, V | INRINGS A A A V |
| Plugs | AT BL DF GJ HM NW OP QY RZ VX | ten cords, before switching on |
| Start position | V J N A | OUTRINGS V J N A |
Ten plug pairs exactly fill the Open Enigma’s ten-cord panel (and its ten-pair software limit). The indicator groups have been removed here, so typing begins at the first group of the text. The ciphertext, in the Kriegsmarine’s four-letter groups, is:
NCZW VUSX PNYM INHZ XMQX SFWX WLKJ AHSH NMCO CCAK UQPM KCSM HKSE INJU
SBLK IOSX CKUB HMLL XCSJ USRR DVKO HULX WCCB GVLI YXEO AHXR HKKF VDRE
WEZL XOBA FGYU JQUK GRTV UKAM EURB VEKS UHHV OYHA BCJW MAKL FKLM YFVN
RIZR VVRT KOFD ANJM OLBG FFLE OPRG TFLV RHOW OPBE KVWM UQFM PWPA RMFH
AGKX IIBG
Typed into a machine set up as above, all 232 letters come out as:
VONVONJLOOKSJHFFTTTEINSEINSDREIZWOYYQNNSNEUNINHALTXXBEIANGRIFFUNTERWASSERGEDRUECKTY
WABOSXLETZTERGEGNERSTANDNULACHTDREINULUHRMARQUANTONJOTANEUNACHTSEYHSDREIYZWOZWONULGRAD
YACHTSMYSTOSSENACHXEKNSVIERMBFAELLTYNNNNNNOOOVIERYSICHTEINSNULL
Broken into words, it reads:
VON VON J LOOKS J HF F T TT EINS EINS DREI ZWO YY QNNS NEUN INHALT XX BEI ANGRIFF UNTER WASSER GEDRUECKT Y WABOS X LETZTER GEGNERSTAND NUL ACHT DREI NUL UHR MAR QU ANTON JOTA NEUN ACHT SEYHS DREI Y ZWO ZWO NUL GRAD Y ACHT SM Y STOSSE NACH X EKNS VIER MB FAELLT Y NNN NNN OOO VIER Y SICHT EINS NULL
The M4 Project gives the authoritative translation. In outline: from Looks, radio signal 1132/19; forced under water during the attack; depth charges (Wabos, Wasserbomben). Last enemy position 08:30 hours, naval grid square AJ 9863, course 220 degrees, eight nautical miles; pursuing. Then the weather: pressure falling, wind north-north-east force 4, visibility ten. “SEYHS” for sechs and “EKNS” for eins are garbles in the signal as sent, and they come out of every faithful machine the same way — a small reminder that this text passed through a tired radio operator’s hands in a U-boat in the North Atlantic.
Two practical notes for the replica. First, a slip anywhere shows quickly: the second word should be VON, and if the lamps do not spell VONVON within the first six letters, a setting is wrong. Second, the Open Enigma’s printer port groups its output in fours, three groups to a line, exactly the Kriegsmarine convention, so a printed decrypt of this message has the right shape for a U-boat signal.
19.7 Quick Checks
Gleason’s Open Enigma for Dummies gives the simplest tests, and the simulator agrees with all of them.
Table 5 — Quick Checks
| Settings | Type | Lamps |
|---|---|---|
| Power-on defaults (B 1 2 3, reflector B, AAAA, AAAA, no plugs) | HELLO | ILBDA |
| Power-on defaults | AAAAA | BDZGO (the textbook Enigma I check value) |
| G 4 5 6, reflector C, INRINGS A B J G, OUTRINGS O P E N, plugs AZ BE CD | YYWBQZ | HMSHMS (a doubled message key) |
| as above, OUTRINGS reset to O H M S | MOOLDLBXKWSZXKY | LETSHAVESOMEFUN |
The first line is also the quickest way to decrypt a message just typed at the defaults: switch off, switch on, go to RUN, and type the ciphertext.
19.8 The Reflector-C Test
One part of the replica’s behaviour deserves an experiment rather than an assertion.
The Open Enigma always enciphers through four wheels and a thin reflector. Its M3 model works because thin reflector B with the Greek wheel Beta at A is electrically the same as the wide reflector B of the Army’s Enigma I — and, likewise, thin C with Gamma at A is the same as wide C. But in the M3 model the Greek wheel is hidden: the left-hand display goes blank, and in ROTORS mode the left keys change only the reflector. Reading S&T’s code suggests that switching to reflector C in M3 mode leaves the hidden wheel as it was, which at power-on is Beta. If that reading is right, M3 mode with reflector C pairs thin C with Beta, which no wartime machine did, and its output will not match a real Enigma I with reflector C.
The test takes a minute:
- Switch on with no cords. Press the leftmost UP key once to select M3.
- ROTORS:
_ 1 2 3, then cycle the left key until lamp C lights. - INRINGS
_ A A A; OUTRINGS_ A A A; pass through PLUGS to RUN. - Type AAAAA.
A true Enigma I with rotors I, II, III, reflector C, rings AAA and start AAA gives PJBUZ. The simulator, following S&T’s code, predicts that the Open Enigma will give LCGPT. If the machine shows PJBUZ, the code reading is wrong (or the machine’s firmware differs from the published sketch) and M3 mode with reflector C is faithful. If it shows LCGPT, M3 mode should be used with reflector B only.
Either way, there is a reliable route to an Enigma I with reflector C: stay in the default M4 model and set ROTORS to G 1 2 3 with lamp C lit, with the Greek wheel’s ring and position at A (INRINGS A A A A, OUTRINGS A A A A). The simulator gives PJBUZ for that, as the Merkblatt’s arithmetic says it should.
19.9 Cross-Checking in Software
A replica is only as trustworthy as the last time it was checked against something independent. Several simulators can do the checking:
- Dirk Rijmenants’ Enigma Simulator, for Windows, models the Enigma I, M3 and M4, and is the program the M4 Project’s page recommends for its messages. Gleason’s guide says to set it to “Kriegsmarine M4 – UKW=B” to match the Open Enigma’s defaults.
- Cryptii, in a web browser, has Enigma I, M3 and M4 models with the thin reflectors.
- CrypTool, the open educational platform, has Enigma models that show the signal path as letters are typed.
enigma_sim.py, the short Python reference used for every example in this volume, also accepts the Open Enigma’s own panel notation:open_enigma("B241", "B", "AAAV", "VJNA", "AT BL DF GJ HM NW OP QY RZ VX")is the U-264 machine, ready to decrypt.
The method is the same whichever is used: set the simulator from the same key sheet, type the same letters, and compare not only the output but the final rotor positions, which catch stepping faults that a short test can miss.
When the replica and the simulator disagree, the usual causes, roughly in order, are:
Table 6 — When the replica and the simulator disagree, the usual causes, roughly in order, are
| Symptom | Likely cause |
|---|---|
| Gibberish from the first letter | A ring setting, rotor or reflector wrong; or the wrong model (M3, M4, or the no-double-step M4) |
| Right for a while, then wrong from one letter on | Stepping: a mistyped start position, or the no-double-step model selected |
| Some letters right, some wrong | The plugboard: a cord not detected, a cord moved after the first visit to PLUGS (Volume 17), or a stray keypad pair |
| Right in M4, wrong in M3 with reflector C | The hidden-Greek-wheel effect described above |
19.10 Closing the Unit
Nineteen volumes ago, this unit began with a box that looked harmless: a wooden case, a keyboard, a lampfield and a row of wheels, trusted absolutely by the people who used it and broken, in secret, by the people who did not. It followed the machine from Scherbius’s commercial venture through the Polish mathematicians, the Bletchley huts, the Bombes and the U-boats, to the long silence afterwards and the museums where the survivors now sit.
It ends with a different kind of box. Mine is a kit of three circuit boards and an Arduino in a finger-jointed case, with a reproduction of a naval instruction card printed in its lid, ten cloth cords in front of its jacks, and my name scrolling across its displays when it is switched on. It is not an Enigma; it has no rotors to lift out and no current flowing through brass. But set it from a key sheet, type a signal that a U-boat commander sent into the North Atlantic in November 1942, and the lamps spell out what he said. The cipher that was the most closely guarded secret of the war is now a few hundred lines of open code, and anyone with patience and a soldering iron can watch it work.
Comments (0)