Enigma · Volume 18
Enigma — Volume 18 — Rewriting the Firmware: My Name in Lights
A banner that is not a string, a sixteen-segment font written as ones and zeros, and the few lines that decide what scrolls across the four windows
18.1 About This Volume
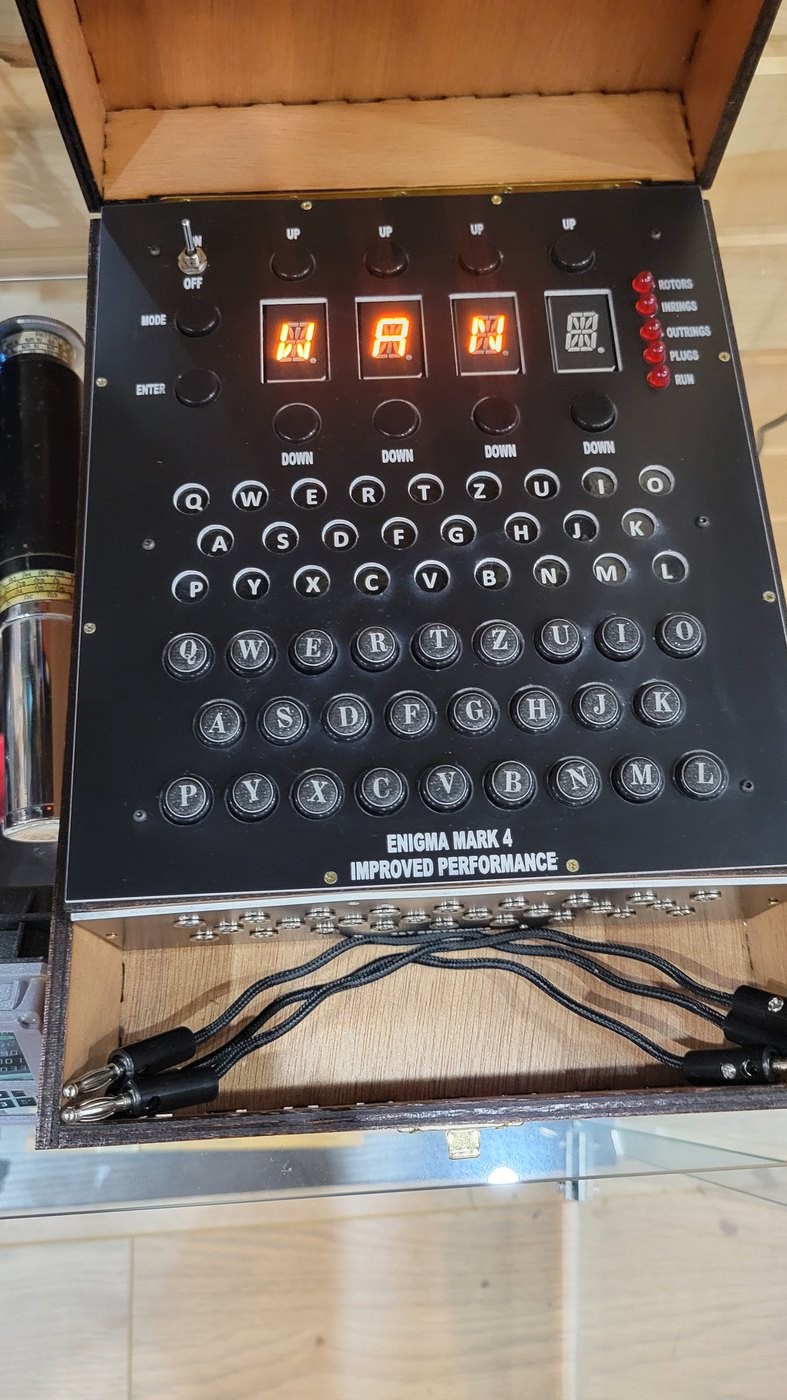
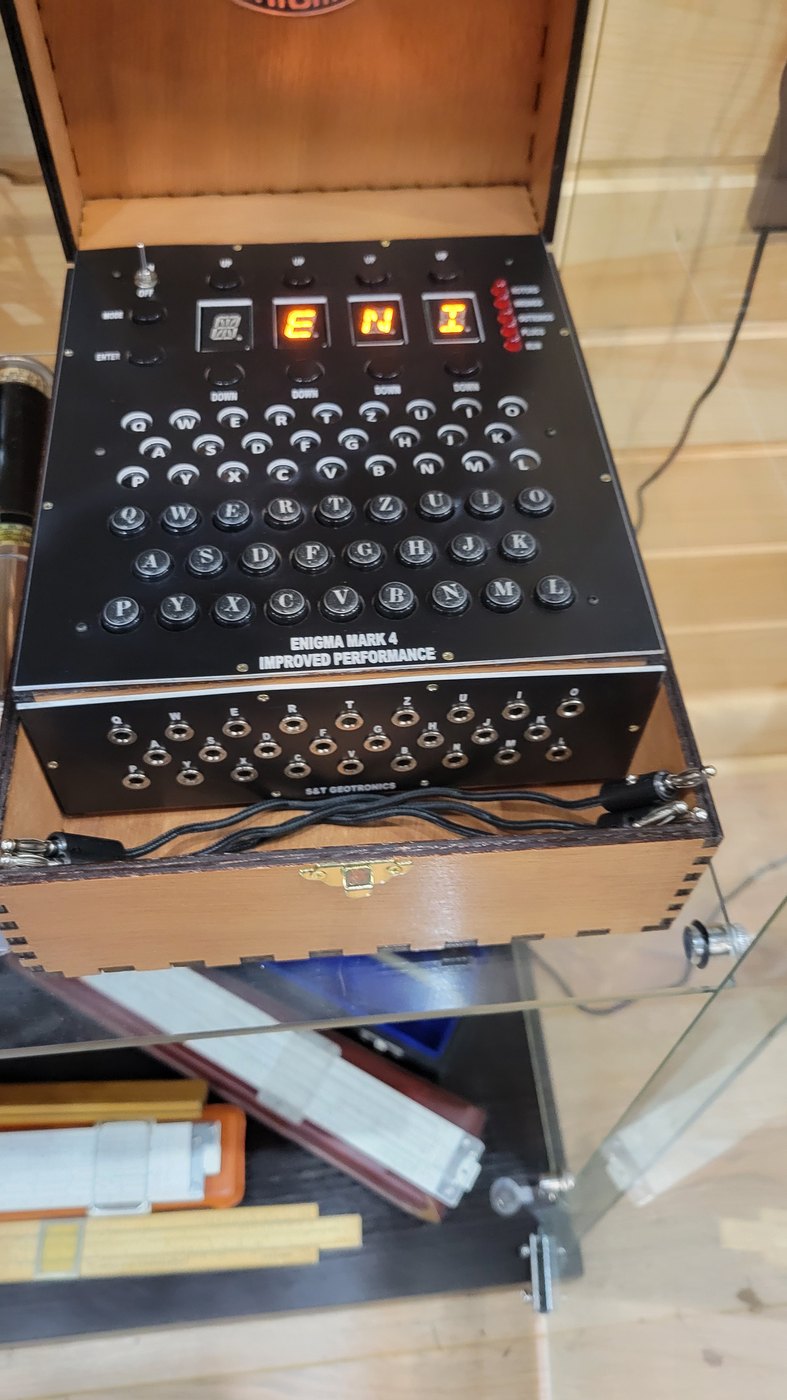
When an Open Enigma is switched on, its four sixteen-segment displays become a scrolling banner. On a machine running S&T GeoTronics’ published firmware, the banner reads “S&T GEOTRONICS ENIGMA MARK 4 DT”. Mine does not. I modified the firmware so that my displays scroll “J Swan Enterprises - Enigma Mark 4”, and the photographs in this volume catch it mid-scroll.
The wartime Enigma could not be reprogrammed; its “program” was the wiring of its rotors, fixed when they were made. The Open Enigma’s cipher, its displays and its behaviour are all a few hundred lines of Arduino code that anyone can open, read and change. This volume is about that code. It covers the toolchain for getting firmware onto the machine’s Arduino Mega, the way the sketch is organised, the sixteen-segment font and how the displays are driven, and the marquee routine that scrolls the banner. It then works through what it takes, in the scheme of S&T’s published sketch, to make the banner carry a different message — mine.
One caution runs through the whole volume. My own modified sketch is not reproduced here. What follows describes S&T’s published code and shows how a change of this kind is made in it; it does not claim to be the exact edit I made.
18.2 Where the Code Lives
S&T published the original sketch with its 2013 Instructable, and named a download site, www.openenigma.com, in its assembly instructions. That site is gone, and S&T’s own downloads page is rendered by JavaScript and did not show a file list when checked for this volume. The code survives on GitHub:
- markusschanta/openenigma (MIT licence) is the de facto canonical copy. It holds S&T’s two sketches:
Open Enigma M4.ino, for machines without the plugboard, andOpen Enigma M4 Plugboard.ino, for the plugboard kit. It also holds BJ Gleason’s Open Enigma for Dummies guide. - bitjungle/openenigma is a fork that splits the plugboard sketch into modules (constants, display functions, modes, plugboard), adds serial debugging output and PlatformIO support, and adds a fourth model, the Norwegian Norenigma. Its README describes it as code for the “S&T GeoTronics Enigma Mark 4 IP Kit Plugged”.
- open-enigma-unofficial/arduino-code holds the same two sketches, with an automatic compile check.
The header of S&T’s sketch records its history: “Designed, assembled & programmed by Marc Tessier & James Sanderson 9/20/13. Modified for our Prototype PCB pair on 12/4/13. Modified to obey doublesteping and have M3 function 22 MAR 14.” Line numbers in this volume refer to Open Enigma M4 Plugboard.ino in the markusschanta repository. An “Improved Performance” machine may have shipped with a later S&T build (its lampfield and printer behaviour are described differently), so the published file and the code on any given IP machine may not match line for line.
18.3 The Toolchain
The Open Enigma is programmed like any Arduino project.
- Language: Arduino C++, in a single
.inofile. The sketch needs no external libraries. - Board: an Arduino Mega 2560 (ATmega2560). The parts list says “Arduino Mega2560 clone”; the code confirms it, because it uses the Mega-only third serial port (
Serial3) and pins up to 53 and A15. - Tools: the Arduino IDE, and a USB cable to the Mega’s USB socket. In the IDE: Tools → Board → “Arduino Mega or Mega 2560”, Processor → ATmega2560, choose the port, and Upload. (These are the standard Arduino steps, not a procedure quoted from S&T.) bitjungle’s README gives the same recipe: “Connect your … Enigma Mark 4 to your computer via USB, and upload the code to the Arduino Mega using the Arduino IDE.” The fork’s PlatformIO file names the same target:
board = megaatmega2560.
Uploading replaces the whole program. Nothing of the old firmware survives the upload, so the only way back is to upload the old sketch again, which is a good reason to keep an untouched copy.
18.4 How the Sketch Is Organised
The plugboard sketch is about 650 lines, and its structure is simple enough to hold in the head.
- Tables at the top. The plug pin map (Volume 17); the banner table
data; the pin lists for the display segments and anodes; the lamp map; the fontsegmentvals; the mode-LED pins; the rotor wiringsrotorvalsand their inversesrotorvali; and the current machine state —wheel[4][3]holds each wheel’s identity, ring setting and position, andplugvalholds the plugboard table. setup()sets every pin, starts the USB serial port at 9600 baud (it prints raw key codes, for debugging) and the printer portSerial3at 19200 baud, and sends the printer a banner. That banner says “S&T GeoTronics ENIGMA MARK 5” — “Mark 5”, not 4, a small inconsistency in S&T’s code.loop()reads the keyboard throughreadkbde()(the resistor-ladder lookup described in Volume 16), handles MODE and the model key, and calls the routine for the current mode:mode0()tomode5().- Helpers.
lampita()andlampitb()light and clear one lamp;nixisend()andsixteenSegWrite()drive the displays;marquee()scrolls the banner;indexwheels()does the rotor stepping, double step included;readplugs()scans the jacks.
The banner touches only three of those pieces: the table data, the font segmentvals, and marquee().
18.5 The Sixteen-Segment Font
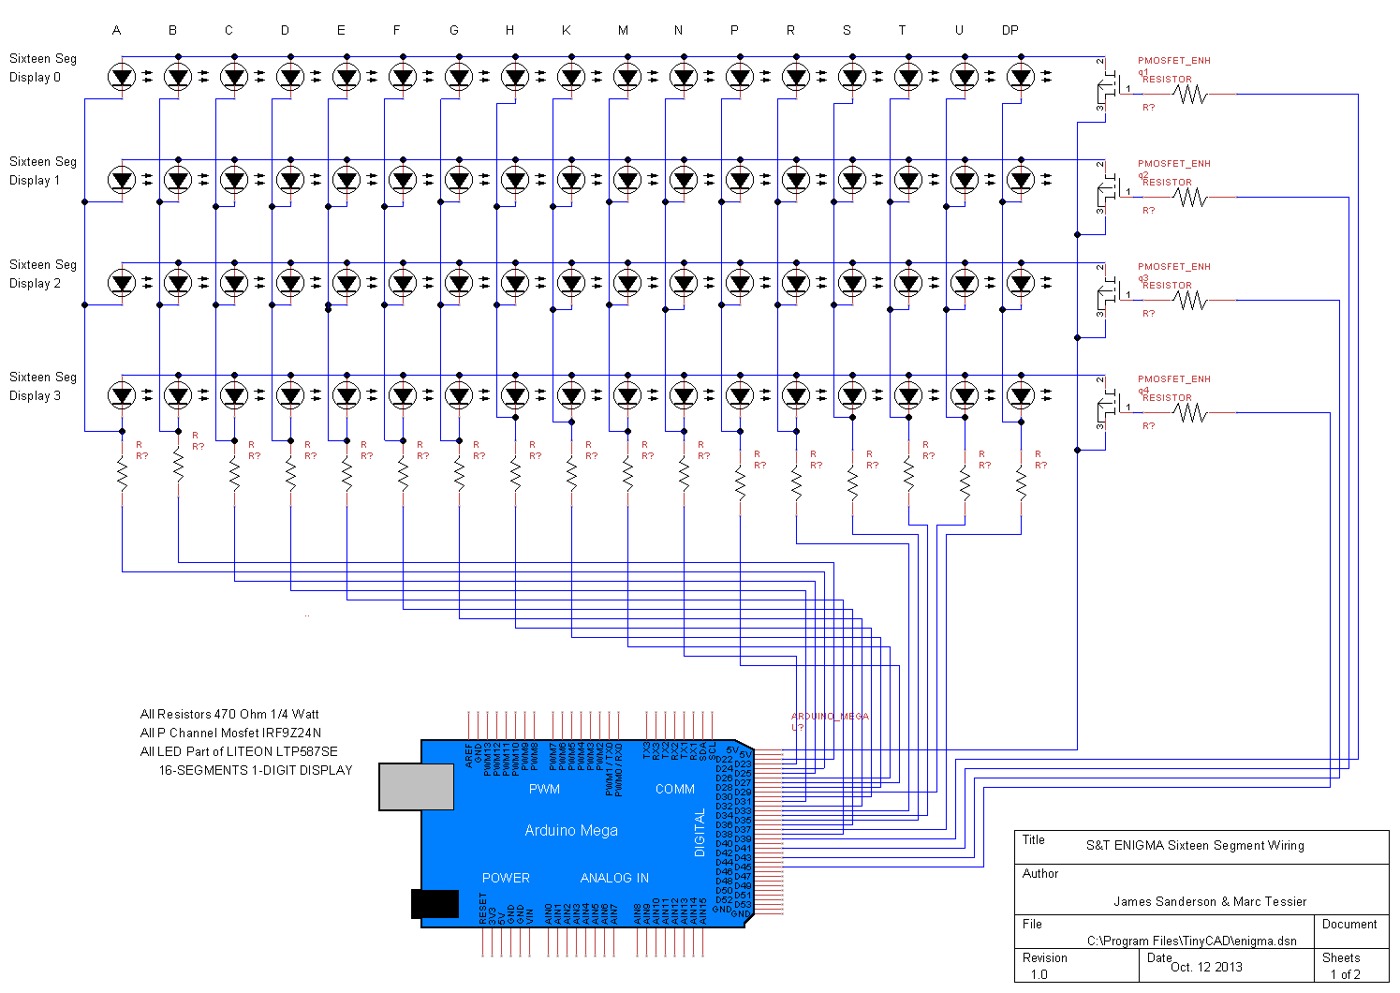
The displays are Lite-On LTP587 units, each with sixteen segments plus a decimal point. The sketch names them as the data sheet does — A, B, C, D, E, F, G, H, K, M, N, P, R, S, T, U and dp — and gives every character as a row of seventeen values in the table segmentvals[40][17]:
// Define each LTP587P Segments: A,B,C,D,E,F,G,H,K,M,N,P,R,S,T,U,dp
boolean segmentvals[40][17] = { { 0,0,0,0,1,1,0,0,1,1,1,0,1,1,1,0,1 },  // = A 0
                                { 0,0,0,0,0,0,1,1,1,0,1,0,1,0,1,1,1 },  // = B 1
                                ...
                                { 1,1,0,0,1,1,0,0,1,1,1,0,1,1,1,0,1 },  // = H 7
                                ...
                                { 1,1,1,1,1,1,1,1,1,1,1,1,1,1,1,1,1 },  // = Space 36
                                { 0,0,0,0,0,0,0,0,0,0,0,0,0,0,0,0,0 },  // = Full Lit 37
                                { 1,0,1,0,1,0,1,0,1,0,1,0,1,0,1,0,1 },  // = SS 38
                                { 0,1,1,1,0,0,0,1,0,0,1,1,0,1,1,0,1} }; // = & 39
The first thing to notice is that 0 means on. The displays are common-anode: each display’s anode is switched high, and a segment lights when its cathode line is pulled low. A space is seventeen ones; “Full Lit”, used as the blank state between refreshes, is seventeen zeros.
The letters in the table are enough to work out the segment layout. The H row lights C, D, G, H, P and U: H needs both vertical strokes on each side and the crossbar, so C and D are the right-hand verticals, G and H the left-hand verticals, and P and U the two halves of the middle bar. The 4 row lights C, D, H, P and U — the right side, the upper left vertical, and the middle bar — which pins H as the upper left and G as the lower left. A and B are the two halves of the top bar, E and F the two halves of the bottom bar, and K, M, N, R, S and T the diagonals and the centre verticals.
The row number in the table is the character code. That gives the sketch a simple alphabet of 40 codes:
Table 1 — The row number in the table is the character code. That gives the sketch a simple alphabet of 40 codes
| Codes | Characters |
|---|---|
| 0–25 | A–Z (A = 0, B = 1, … Z = 25) |
| 26–35 | the digits 0–9 (0 = 26, 1 = 27, … 9 = 35) |
| 36 | space |
| 37 | all segments lit |
| 38 | ”SS”, an alternating test pattern |
| 39 | & |
There is no lower case and no punctuation apart from the ampersand. The code doubles as a convenience elsewhere: the ROTORS display shows rotor numbers by storing each wheel as codes 27 to 34, which the font draws as the digits 1 to 8, and PLUGS mode spells “A TO B” as codes 0, 19, 14, 1.
18.6 How the Displays Are Driven
Seventeen cathode lines are shared by all four displays, so only one display can be lit at a time. The routine that does the work is short:
void sixteenSegWrite(int digit, int character) {
  digitalWrite(anode[digit], 0);                 // switch this display on
  for (int index = 0; index < 17; index++) {
    digitalWrite(segment[index], segmentvals[character][index]);
  }
  delay(3);                                      // hold it for 3 ms
  for (int index = 0; index <= 16; index++) {
    digitalWrite(segment[index], 1);             // blank every segment
  }
  digitalWrite(anode[digit], 1);                 // and switch the display off
}
nixisend() — the name is a holdover from Nixie tubes — calls it four times, once per display, with the characters held in dig1 to dig4. Every pass of loop() therefore lights each display for 3 ms in turn: about 12 ms for the four, plus a few milliseconds for the lamps. That works out at roughly 60 to 70 full refreshes per second, fast enough that the eye sees four steadily lit characters rather than one flickering at a time. (The anode is switched on by writing 0 because the anode drive goes through a P-channel MOSFET, which conducts when its gate is pulled low.)
18.7 The Marquee
The banner is not a string. It is a table of character codes, one row per machine model, in lines 46–48:
int data[3][40] ={ {36,36,36,36,18,39,19,36,6,4,14,19,17,14,13,8,2,18,36,4,13,8,6,12,0,36,12,0,17,10,36,30,36,13,3,19,36,36,36,36},
                   {36,36,36,36,18,39,19,36,6,4,14,19,17,14,13,8,2,18,36,4,13,8,6,12,0,36,12,0,17,10,36,30,36,36,3,19,36,36,36,36},
                   {36,36,36,36,18,39,19,36,6,4,14,19,17,14,13,8,2,18,36,4,13,8,6,12,0,36,12,0,17,10,36,29,36,36,3,19,36,36,36,36} };
Decoded with the table above, the three rows read:
Table 2 — Decoded with the table above, the three rows read
| Row | Model (behavior) | Banner |
|---|---|---|
| 0 | M4, no double step | S&T GEOTRONICS ENIGMA MARK 4 NDT |
| 1 | M4 with double step (default) | S&T GEOTRONICS ENIGMA MARK 4 DT |
| 2 | M3 | S&T GEOTRONICS ENIGMA MARK 3 DT |
Each row is exactly 40 codes: four spaces of lead-in, 32 characters of text, and four spaces at the end. The rows differ only near the end, which is how the banner tells the operator which model is selected: pressing the leftmost UP key in mode 0 changes the variable behavior, and with it the row being scrolled. Gleason’s guide describes this from the operator’s side: “You will see the mode at the end of the marquee message.”
The scroller itself is fourteen lines (574–587):
void marquee() {
  time = millis();
  if (mtime < time) {
    mtime = time + 400;          // every 400 ms...
    mdex++;                      // ...move the window one place
  }
  dig1 = data[behavior][mdex];   // a 4-character window
  dig2 = data[behavior][mdex + 1];
  dig3 = data[behavior][mdex + 2];
  dig4 = data[behavior][mdex + 3];
  if (mdex >= 35) {mdex = 0;}    // wrap back to the start
  nixisend();
}
mdex is the position of a four-character window sliding along the row. Every 400 milliseconds the window moves one place to the left, which makes the text appear to move right to left across the displays. When the window reaches position 35 — the row length of 40, less 5 — it is shown once, briefly, and the window jumps back to position 0, which is four spaces. A full cycle is 35 steps of 0.4 seconds, about 14 seconds. With the window at 35, the last code it reads is number 38; the 40th code is never displayed, but it is a space, so no one notices. The routine only runs in mode 0, so the banner stops as soon as MODE is pressed and resumes from where it was when the machine is cycled back round.
Because the four-space lead-in and the wrap position are matched to the row length, three numbers have to agree for the banner to scroll cleanly: the length of each row, the wrap test in marquee(), and the number of characters in the text. Change the text without minding the other two, and the banner will either stop short, jump, or read past the end of the table into whatever variable comes next in memory. bitjungle’s fork shows how easily that happens: its banner rows are 21 entries long and its wrap test is mdex >= 21, so for its last two frames the window reads up to four entries beyond the end of the row. It is harmless in practice, but it is exactly the kind of slip that editing this routine invites.
18.8 My Change: “J Swan Enterprises - Enigma Mark 4”
The evidence for my change is on the machine itself. Switched on, it scrolls J SWAN ENTERPRISES - ENIGMA MARK 4 across the four displays, in capitals, and the photographs in this volume catch three moments of it: “WAN” from my surname, “ENI” and “GMA” from ENIGMA, each with a blank display where a space is passing.
18.9 How the Text Encodes in S&T’s Scheme
Whatever my own code looks like, the published sketch fixes what any such change has to deal with. The text “J Swan Enterprises - Enigma Mark 4” raises three questions.
Lower case. The font has none. The lower-case letters of the name have to be entered as capitals — which is how they appear on my displays. The banner shows “J SWAN ENTERPRISES”, not “J Swan Enterprises”.
The hyphen. The font has no ”-”. There are three ways round that: replace it with a space; add a new glyph; or reuse a code the sketch does not otherwise use. Code 38, the “SS” test pattern, appears in the font table but nowhere else in the sketch. A hyphen is the two halves of the middle bar, segments P and U, which in the font’s notation (zero for on) is:
{ 1,1,1,1,1,1,1,1,1,1,1,0,1,1,1,0,1 } // = - (segments P and U lit)Added as a new character, it would become code 40, and the table’s first dimension would have to grow from [40] to [41]. Overwriting row 38 instead keeps the table size unchanged.
Length. Counting the spaces, the text is 34 characters. In the font’s codes, with a hyphen as code 40, it is:
J  _  S  W  A  N  _  E  N  T  E  R  P  R  I  S  E  S  _  -  _  E  N  I  G  M  A  _  M  A  R  K  _  4
9,36,18,22, 0,13,36, 4,13,19, 4,17,15,17, 8,18, 4,18,36,40,36, 4,13, 8, 6,12, 0,36,12, 0,17,10,36,30(_ marks a space, code 36.) S&T’s own text is 32 characters, and its rows carry four spaces at each end to make 40. The same pattern for a 34-character text needs 42 entries: four spaces, the 34 codes, and four spaces. The row dimension then becomes [42] and, to keep the same scrolling behaviour, the wrap test becomes the new length less 5:
int data[3][42] = { {36,36,36,36, 9,36,18,22,0,13,36,4,13,19,4,17,15,17,8,18,4,18,36,40,36,
                     4,13,8,6,12,0,36,12,0,17,10,36,30,36,36,36,36}, ... };
...
  if (mdex >= 37) {mdex = 0;}
This is a worked illustration of the published scheme, not a copy of my code.
With those numbers, the window passes through 37 positions per cycle, about 14.8 seconds. “WAN ” is in the window at position 7, about 2.8 seconds into each cycle; ” ENI” at position 24, about 9.6 seconds; and “GMA ” at position 28, about 11.2 seconds — the three moments in my photographs.
The text can also be squeezed into S&T’s original 40-entry rows, by cutting the trailing spaces to two and leaving the wrap test at 35. It still runs, but the end changes. Where S&T’s banner leaves the last characters drifting off to the left (“DT ” and then blank), the 34-character text would be cut off at “RK 4”, with the “4” still in the third display, before the window jumps back to the blank start. Either form is consistent with the photographs. Only my sketch can say which one I used.
Which rows. Because the banner is chosen by model, a new message typed into row 1 alone appears only in the default M4 model; switching to M3 or the no-double-step model brings S&T’s original banner back. Putting the same message in all three rows makes it appear in every model, at the cost of the model indicator that S&T’s design put at the end of the banner. A builder who wants both can end each row differently — for example ”… ENIGMA MARK 4”, ”… ENIGMA MARK 3” and ”… MARK 4 NDT” — with each row padded to the same length.
18.10 Testing a Firmware Change
A firmware edit to an Enigma replica has an unusual property: a mistake in the banner is obvious, but a mistake anywhere else might not be. A slip in a rotor table produces a machine that still lights a lamp for every key, still decrypts its own messages, and is no longer an Enigma. After any upload, two short tests from Volume 19 establish that the cipher is untouched:
- At the defaults, the machine should turn HELLO into ILBDA and AAAAA into BDZGO.
- With the settings from the M4 Project, the first groups of the U-264 message of 1942 should decrypt to VONVONJLOOKS…
If both pass, the rotor wirings, stepping, reflector and plugboard handling are all working as S&T wrote them.
18.11 What the Change Shows
Changing a banner is a small edit, and it is meant to be. It shows how little separates the user of an Open Enigma from its author: the cipher, the font and the banner are all tables of numbers in one file, in plain view. The same edit, made with a little more ambition, can add a rotor or a reflector (bitjungle’s Norenigma does), log every internal step over the USB port, or change how the machine steps. No wartime operator could do any of that, and no wartime operator was meant to. The original Enigma’s security depended in part on its wiring being secret; the Open Enigma has nothing to hide, and so its owner can make it say whatever he likes when it is switched on.
Next — Volume 19: Sending Real Messages. A key sheet, the wartime indicator procedure, and every setting entered on the Open Enigma, step by step: a fully worked message enciphered and checked, a real U-boat signal from November 1942 decrypted on the machine, and a one-line test that shows whether the M3 mode’s reflector C behaves like the real thing.
Comments (0)